One of the most effective ways to keep consumers interested in your application is through push notifications. Push notifications assist in sending critical changes straight to customers’ devices, whether you’re developing a booking system, social media platform, e-commerce software, or news application.
Firebase Cloud Messaging (FCM) is the most widely used method for implementing push notifications in Flutter. It is dependable, free, and compatible with iOS, Android, and the web.
This comprehensive article will teach you how to receive alerts in the background, manage Android 13+ notification permissions, integrate Firebase Cloud Messaging in Flutter, and take action when users tap notifications.
Why Use Firebase Cloud Messaging?
Firebase Cloud Messaging (FCM) allows developers to:
- Send notifications to specific users
- Broadcast notifications to all users
- Deliver promotional messages
- Send order and booking updates
- Notify users about app activities
- Re-engage inactive users
Benefits of FCM
- Free to use
- Cross-platform support
- Reliable delivery
- Topic-based messaging
- Rich notification support
- Analytics integration
Prerequisites
Before starting, make sure you have:
- Flutter SDK installed
- Firebase project created
- Android Studio or VS Code
- Flutter app connected with Firebase
Step 1: Add Firebase Dependencies
Add the required packages in your pubspec.yaml file.
dependencies:
  firebase_core: latest_version
  firebase_messaging: latest_version
Install packages:
flutter pub getStep 2: Configure Firebase
Initialize Firebase before running the application.
void main() async {
  WidgetsFlutterBinding.ensureInitialized();

  await Firebase.initializeApp();

  runApp(const MyApp());
}
Step 3: Android Configuration
Add the following permissions inside your Android Manifest.
Location:
android/app/src/main/AndroidManifest.xmlAdd:
<uses-permission android:name="android.permission.INTERNET"/>

<uses-permission
    android:name="android.permission.POST_NOTIFICATIONS"/>
The POST_NOTIFICATIONS permission is mandatory for Android 13 and above.

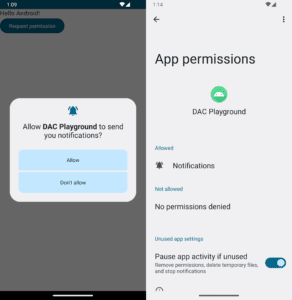
Android 13+ Notification Permission Handling
Starting from Android 13 (API Level 33), users must explicitly grant notification permission before receiving notifications.
Without this permission:
- Notifications will not appear
- FCM messages may arrive silently
- User engagement decreases significantly
Request Permission
FirebaseMessaging messaging =
    FirebaseMessaging.instance;

NotificationSettings settings =
    await messaging.requestPermission(
      alert: true,
      badge: true,
      sound: true,
    );
Check Permission Status
if (settings.authorizationStatus ==
    AuthorizationStatus.authorized) {
  print("Permission Granted");
} else {
  print("Permission Denied");
}
Important Note
Android 12 and lower versions do not display a notification permission popup because the operating system automatically grants notification access during app installation.
Step 4: Get Device FCM Token
Each device receives a unique token.
String? token =
    await FirebaseMessaging.instance.getToken();

print(token);
Store this token on your backend server.
Why?
Because the token is required for sending notifications to a specific user.
Example use cases:
- Order status updates
- Chat messages
- Booking confirmations
- Personalized alerts
Step 5: Receive Notifications in Foreground
When the app is open, notifications are received using:
FirebaseMessaging.onMessage.listen(
  (RemoteMessage message) {

    print(message.notification?.title);
    print(message.notification?.body);

});
Example Output:
Title: New Offer Available
Body: Get 20% discount today
Step 6: Handle Background Notifications
Background notifications are received when the app is minimized.
Create a top-level handler.
Future<void> firebaseMessagingBackgroundHandler(
    RemoteMessage message) async {

  await Firebase.initializeApp();

  print("Background Message");
}
Register it inside main:
FirebaseMessaging.onBackgroundMessage(
    firebaseMessagingBackgroundHandler);
Common Use Cases
- Booking updates
- Payment notifications
- Delivery tracking
- Chat messages
- Reminder alerts
Step 7: Handle Notification Click Actions
One of the most important features is opening a specific screen when a user taps a notification.
Example:
FirebaseMessaging.onMessageOpenedApp
    .listen((RemoteMessage message) {

  Navigator.push(
    context,
    MaterialPageRoute(
      builder: (_) => NotificationScreen(),
    ),
  );

});
Handle App Launch from Notification
Sometimes users tap a notification when the app is completely closed.
Handle this scenario:
RemoteMessage? initialMessage =
    await FirebaseMessaging.instance
        .getInitialMessage();

if (initialMessage != null) {

  Navigator.push(
    context,
    MaterialPageRoute(
      builder: (_) => NotificationScreen(),
    ),
  );

}
This ensures a seamless user experience.
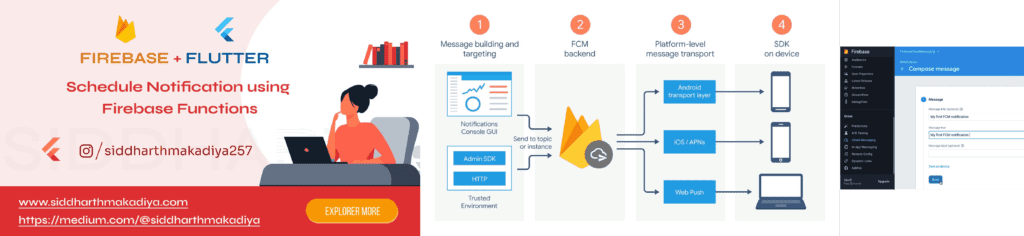
Sending Notifications from Firebase Console
Firebase provides an easy dashboard for testing notifications.
Steps:
- Open Firebase Console
- Select your project
- Go to Messaging
- Create Notification
- Enter Title and Message
- Select Target Audience
- Send
You can instantly test push notifications without writing backend code.
Best Practices for Flutter Push Notifications
Keep Messages Short
Good:
Your order has been shipped.Bad:
Your order number 12345 has been processed and shipped from our warehouse and should arrive within the next 3 to 5 business days.Use Deep Linking
Open relevant screens directly.
Examples:
- Order screen
- Chat screen
- Product details page
Avoid Spam
Sending too many notifications often results in:
- Uninstalls
- Disabled notifications
- Poor engagement
Segment Users
Send notifications based on:
- User interests
- Location
- Purchase history
- App activity
Common FCM Issues and Solutions
Notification Not Received
Check:
- Firebase initialization
- Device internet connection
- FCM token validity
- Android permission status
Android 13 Notifications Not Showing
Verify:
POST_NOTIFICATIONSpermission is added.
Also ensure permission is requested at runtime.
Notification Click Not Working
Make sure:
FirebaseMessaging.onMessageOpenedAppand
getInitialMessage()are properly implemented.
Conclusion
Firebase Cloud Messaging remains the most reliable solution for implementing push notifications in Flutter applications. By correctly configuring FCM, handling Android 13 notification permissions, managing background messages, and implementing notification click actions, you can significantly improve user engagement and retention.
Whether you’re building a shopping app, booking platform, social network, or enterprise application, push notifications play a critical role in delivering real-time information and enhancing user experience.
Investing time in a proper notification strategy today can lead to better engagement, higher retention rates, and a more successful Flutter application tomorrow.
Stay Connected with FutureAppCode
🚀 Want more practical Flutter, Android, and WordPress tutorials?
At FutureAppCode, we share real-world development guides, coding solutions, performance optimization tips, and step-by-step tutorials that help developers build better applications faster.
Whether you’re a beginner or an experienced developer, our goal is to provide content that is simple, practical, and production-ready.
👉 Visit https://futureappcode.com/ for more developer-focused tutorials and the latest technology insights.
Related Articles:
Top Flutter Packages Every Developer Should Use in 2026